Tuesday, November 28, 2017

Udemy Docker notes

I was doing a course on Docker at Udemy ( https://www.udemy.com/docker-mastery/ ), here are my notes about it.
Kudos to Brett Fisher (https://twitter.com/bretfisher) who has done an amazing job creating this course. Thanks!

http://labs.play-with-docker.com 
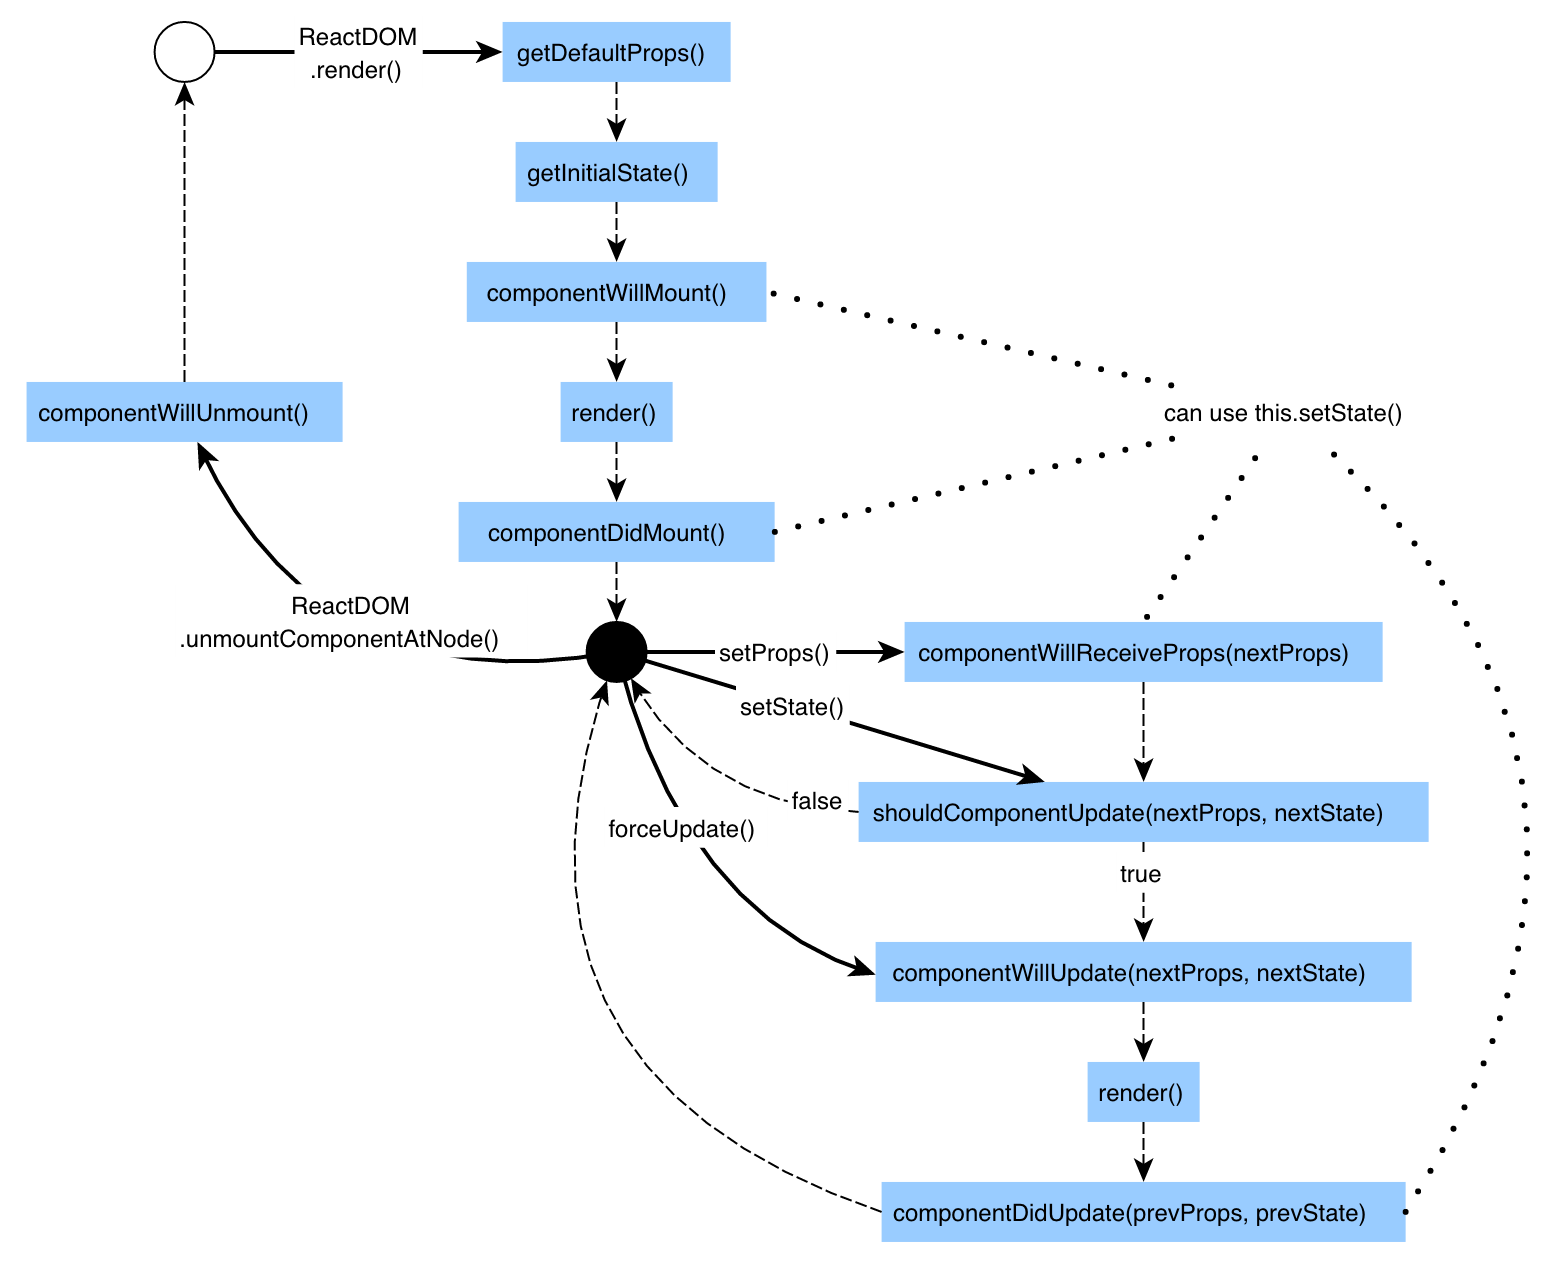
New command syntax

  • docker container ls
  • docker container ls -a
  • docker container start

What does docker container start actually do?

  1. Looks for the image in the image cache
  2. Then looks in remote hub (docker hub default)
  3. Downloads latest version
  4. Starts a new container based on that image
  5. Gives it a virtual IP !!INSIDE!! the docker engine on a private network
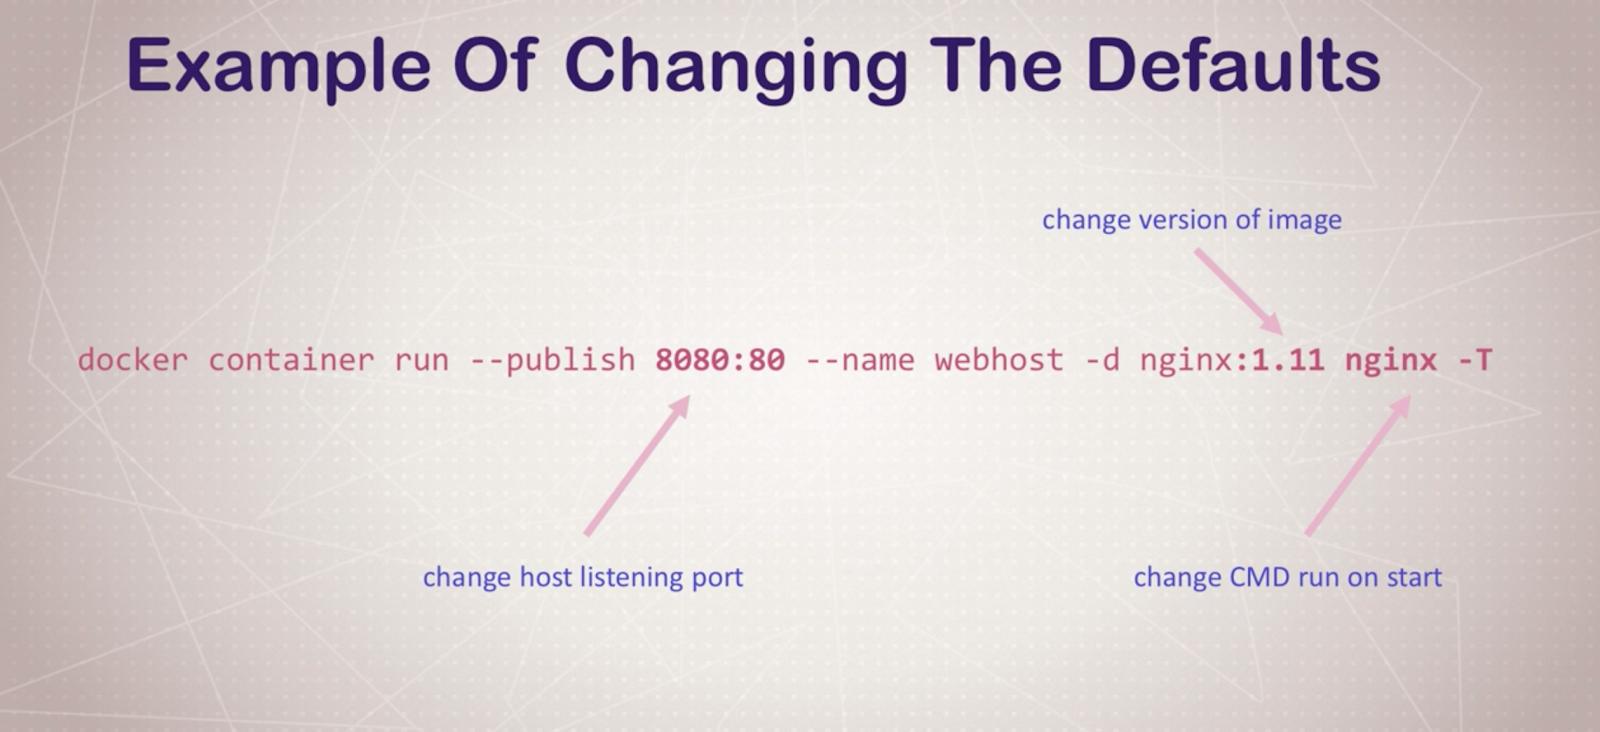
  6. Opens up port 80 on host and forwards to port 80 in container (with the --publish command)
  7. Starts container using the CMD in the image Dockerfile


Containers aren’t really VM-s: THEY ARE JUST PROCESSES

CLI process monitoring

  • docker container top: list running processes in a specific container
  • docker container inspect [ID/NAME]: gets metadata for that container (like volume, config, etc..
  • docker container stats: shows live performance measures for all the containers running


Getting a shell inside a container

  • docker container run -it: start new container interactively (with CLI, e.g. with bash)
  • docker continer exect -it: run additional command in existing container (no ssh needed!!)

-it means: interactive (keeps session open to keep terminal input), -t pseudo-tty (simulates a real terminal, like what ssh does)

Docker networks
-p: exposing ports
BUT: you don’t have to expose all the time, you can create sub virtual networks which are going to “understand” and “see” each other, so you can just define a communication without exposing ports.
docker container inspect --format '{{ .NetworkSettings.IPAddress }}' webhost: just the IP . NEAT
Communicating with two virtual networks (subnetworks) is only able to do by going out to the exposed ports to the outside and communicate over there.

Docker network CLI

  • docker network ls: networks
  • docker network inspect: get metadata from a network
  • docker network create --driver: creates a network
  • docker network connect / disconnect

With docker swarm this is easier to do!

Docker container DNS
Docker daemon has a built-in DNS server that container use by default.
Note: IP-s are not good way to communicate, use names instead! Apps can fail and get new IP address, but it can fall back to a name with a different ID still!

Container images
What’s in an image:

  • App binaries and dependencies
  • Metadata about the image data and how to run the image

Download an image from Docker Hub.

docker pull [OPTIONS] NAME[:TAG|@DIGEST]
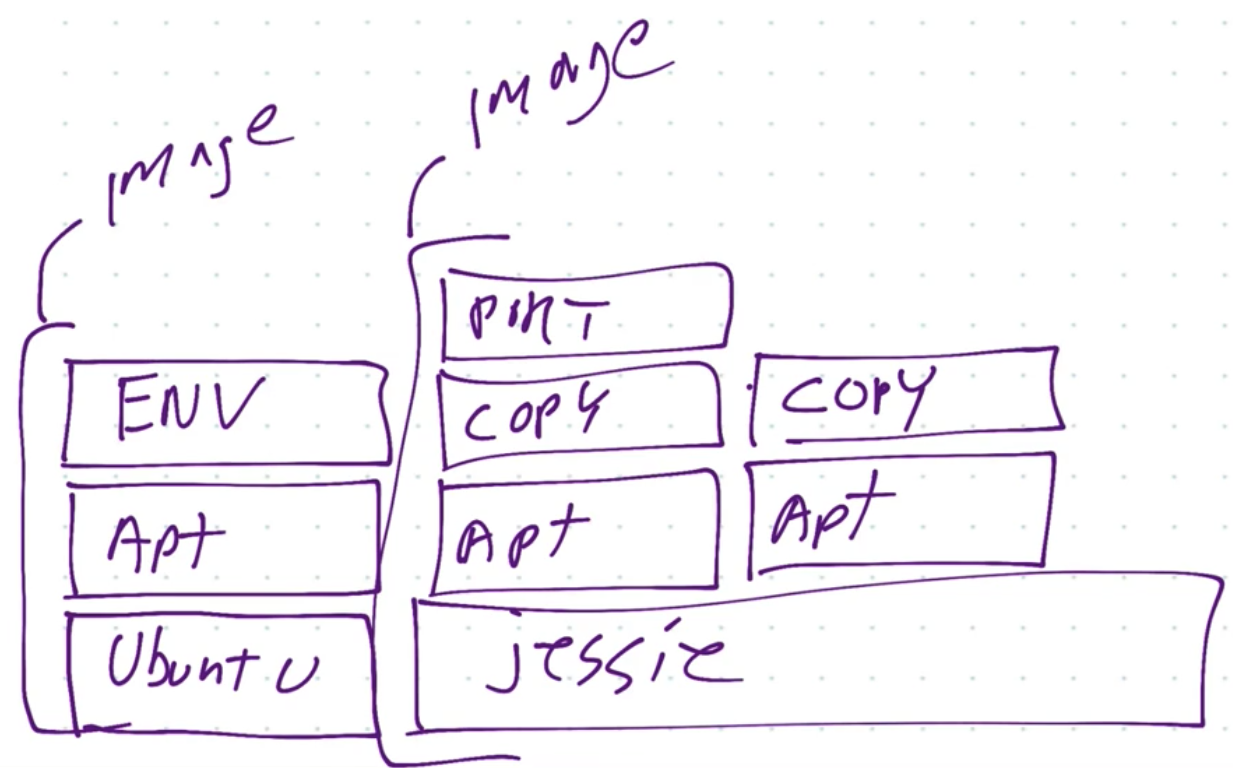
Image layers

  • Image layers:
  • docker image history nginx

    • history of the image layers
    • basically an image layer is a new command / change to the previous one, e.g. like the base image layer is ubuntu, and then apt-get -ing something (like mysql), and that’s going to be the next image layer
    • On the picture above you can see how caching is done: if 2 images are using jessie image layer, it is not going to be dupicated, both images will use the same jessie image (layer)
    • Image layers are saved and basically attahed together for an image (so it can save space)
    • docker image inspect nginx
  • Image tagging and pushing to docker hub
    • a very similar process like git
  • Dockerfile
    • instructions how to build our image
    • FROM: which is the starting image
    • ENV: set environment variable
    • RUN: run commands
    • EXPOSE: expose port  (you still have to run -p if you would like to expose this to the outside) - so basically I am ALLOWING the image to be exposed, but I still have to do it explicitly!
    • CMD: run a command when container is run
    • General best practice: keep the less changing things on the top of the Dockerfile and and the more changing at the bottom


Persistent Data

Volumes
Persistent data for images.
docker volume ls

Bind Mounting
Maps a host file or directory to a container file or directory.
Basically just two locations pointing to the same file(s).
CAN’T USE IN DOCKERFILE, MUST BE IN container run .
That’s really good for development - binding local files to the containers

Docker-compose
You can use sub containers to communicate with each other. Neat!
docker compose up - this is starting all the containers which are defined in docker-compose.yml file.
With docker-compose you can manage a multi-container environment easily.
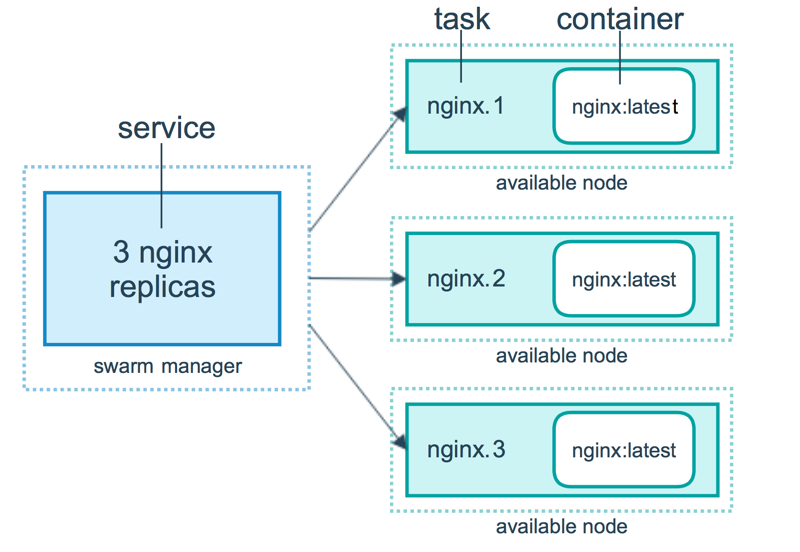
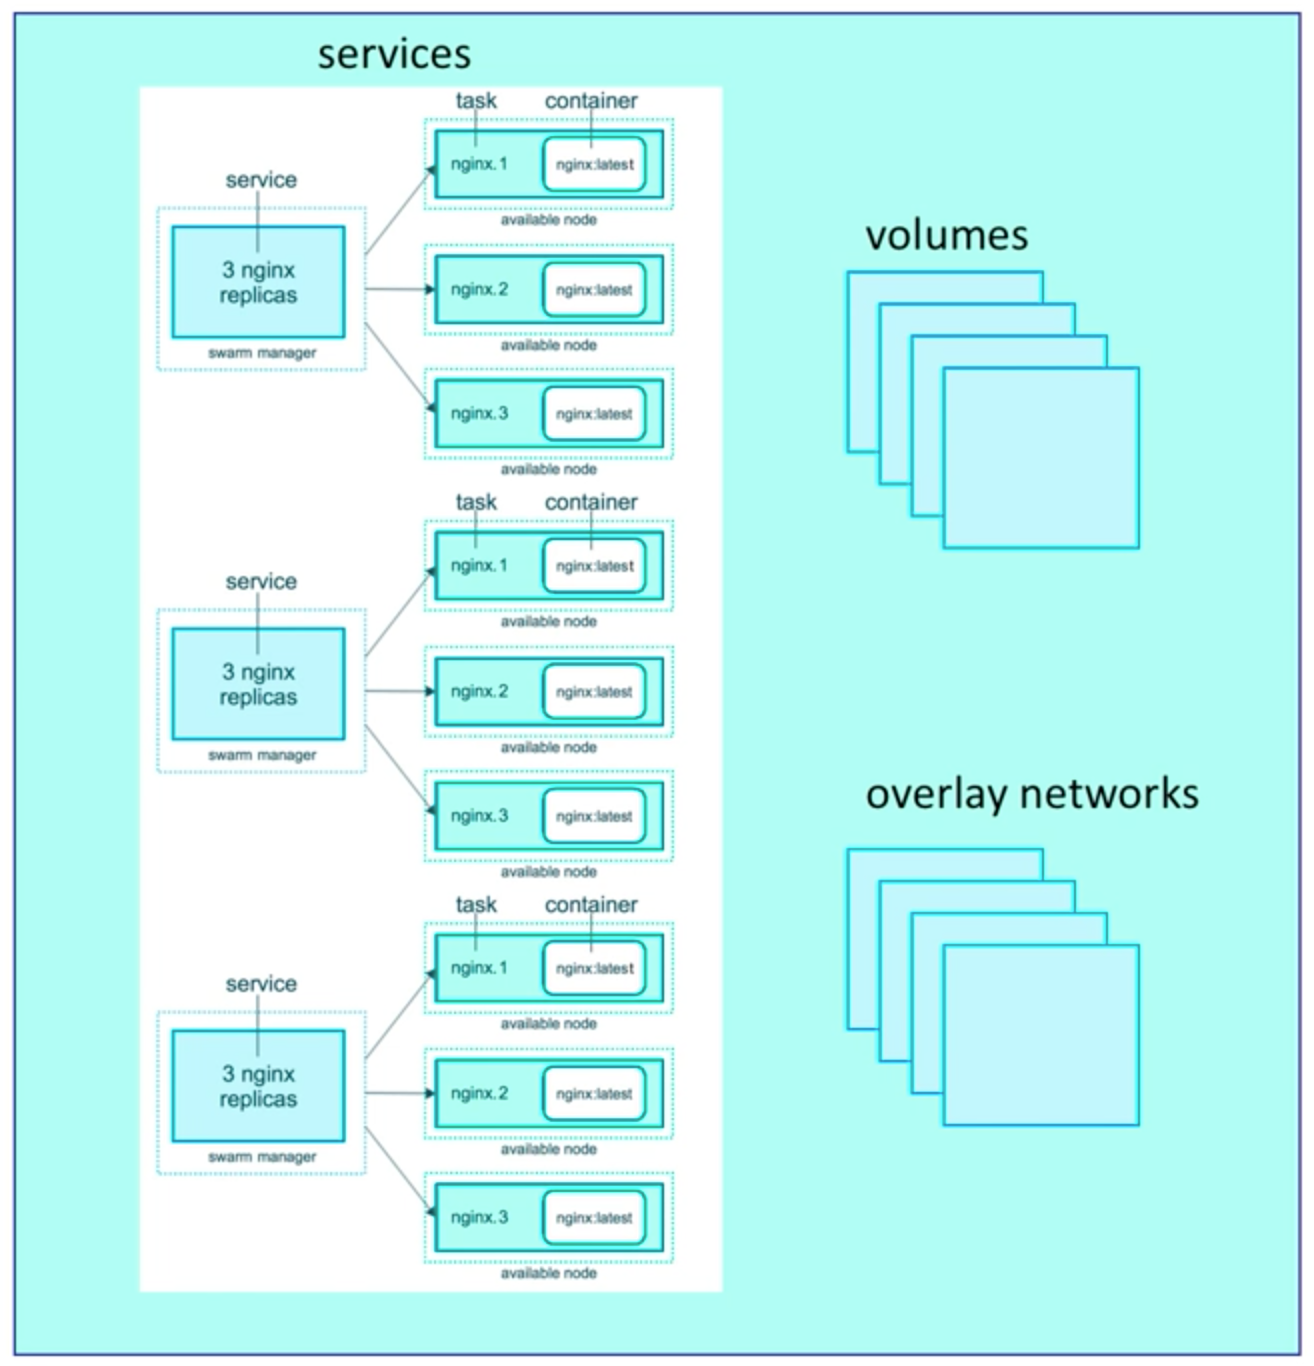
Docker swarm

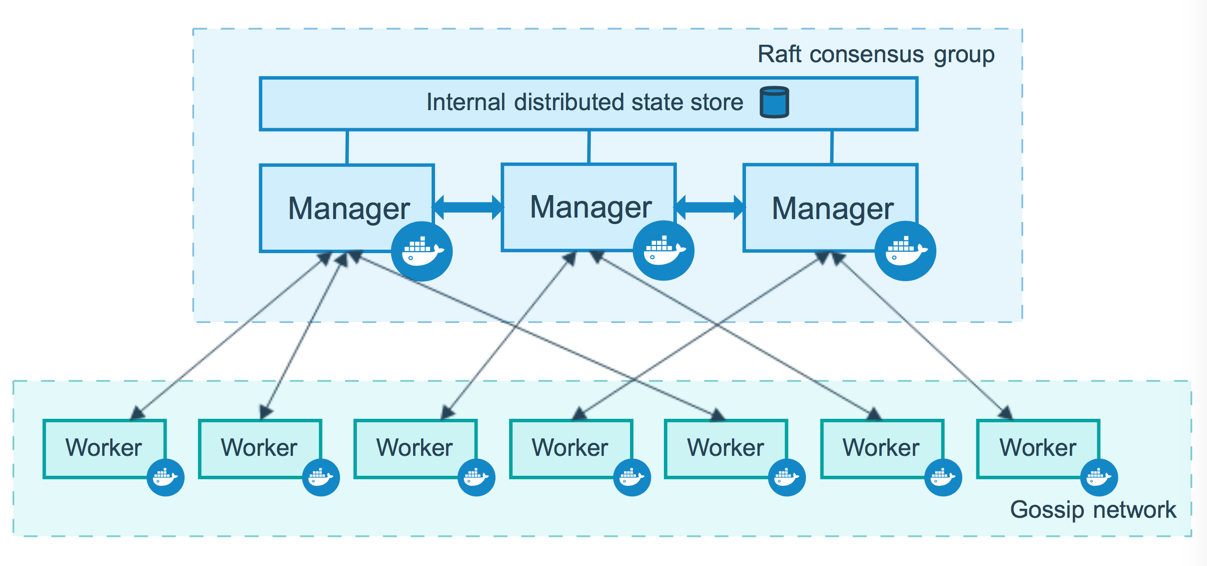
Server clustering solution.
Can orchestrate the lifecycle of your containers.
docker swarm init - enables swarm mode in an environment (so you can run your own swarm in your computer)
With the swarm API we are not directly communicating with containers, rather we are just communicating with the orchestration which will make sure the commands will be executed, and e.g. if a service dies, it will make sure it re-runs it!


Routing mesh
The routing mesh enables each node in the swarm to accept connections on published ports for any service running in the swarm, even if there’s no task running on the node. The routing mesh routes all incoming requests to published ports on available nodes to an active container.

Stacks

Basically compose files for swarms.
docker stack deploy
Docker compose ignores deploy and swarm ignores build. Separation of concerns.
docker-compose cli not needed on Swarm server!
1 stack → 1 swarm!

Secrets
Easiest “secure” solution for storing secrets in Swarm.
Secret:

  • usernames, passwords
  • TLS certificates and keys
  • SSH keys
  • Any data you would prefer not be “on front page of news”


SWARM & STACK & SECRETS are cool!

Saturday, September 30, 2017

React portals!

React 16 is here!
This new version is extremely interesting not just because it has some new cool features, but it's a complete rewrite from the start!
It's fascinating how well TDD (Test Driven Development) can work in real-lief, huge projects like React itself, since the aim was to create the new React while fixing all the tests that the "old" React had. And they did it! Step by step, day by day, with hard work, but they did it. And even new features! Kudos to the React team and especially Dan Abramov!
There are few new features like:

  • fragments and string: basically don't have to return one single elemnt in render
  • better error handling: the new <ErrorBoundary><MyComponenentWhichCouldError /></ErrorBoundary> component which "polyfills" the wrapped component with a new lifecycle method called componentDidCatch which works like a catch{..} in JS
  • Portals: later in this article
  • Better server side rendering: for me this is not a big change since I haven't really used SSR :P
  • Support fro custom DOM attributes: unrecognized React HTML and SVG elements are passed through the DOM now
  • Reduced file size
  • MIT license
  • New core architecture(Fiber): featuring async rendering which is basically a two step rendering mechanism with a commit and render phase. Here is a demo: https://build-mbfootjxoo.now.sh/ -- mind the square in the top right corner!
Let's talk a bit more about portals.
These are meant to solve out of the parent component communication, which could be done before but it was a bit hacky.
Now we can define a component which is going to refer to a DOM component which is not is not under the parent component (basically out of the current component's reach). This component is going to use a portal to refer to a DOM component.
Now we can use the component defined above in another React component without even knowing it's using porals! Neat!
Here is an example based on this pen. Mind that there is a component which is using a portal (Modal) and the other one (App) does not know Modal is using portals, and it is using it.

See the Pen React portals modal example ! by Adam Nagy (@nagyadam2092) on CodePen.

Sunday, September 10, 2017

React beginner assignment

Sometimes I do computer science teaching and get stuck how to do it properly. I like to give a small theoretical sum of what a lesson is about but then immedately give an exercise where the candidate can try out the new concepts.
This time I was asked to give lessons on React and I thought the best way would be to give an assignment which will test whether the student understood the core concepts of it. So here is the assignment (and here is a solution: https://stackblitz.com/edit/react-assignment-nr-1-solution)
There is an App component which stands for the wrapper of the component and 4 other (child) components:
In summary:

  • App component: in it's state it has an appState which is initially 1 but it can be increased with a button.
  • CompOne component: waits for an appState prop, displays it, plus it has it's own state: compOneState which you could edit with a textinput (more info: https://facebook.github.io/react/docs/forms.html#controlled-components)
  • CompTwo: almost the same as CompOne: awaits for appState prop, displays it, and it also has it's own state: compTwoState which is initialized by 1 and it could be increased with a button.
  • CompFour: only props are required: appState, compOneState which it displays
  • CompThree: almost the same as CompFour - only props: appState and compTwoState, displays is.
This is how it should look like approximately:
Pseudo code:
<App>
    <CompOne>
        <CompFour />
        <CompFour />
    </CompOne>
    <CompTwo>
        <CompThree />
        <CompFour />
    </CompTwo>
</App>

  • App: red border
  • CompOne: blue border
  • CompTwo: green border
  • CompThree: black border
  • CompFour: grey border
 Have fun learning!

Thursday, July 6, 2017

Understanding JWT

Using JWT-s is a widely accepted way of authentication.
The reason why JWT-s are used is to prove that the sent data was actually created by an authentic source.
This means the client will get this token which is signed somehow with a secret (stay tuned) and with that the server can trust that client that it is already authenticated without having to handle sessions in memory.
It's very important to mention that the purpose is not to hide data! Let me show you this through an example.

Autopsy of a token

I would like to give a try for another approach by explaining how JWT-s work and it is by using an existing example and analysing it.
Let's have a token:
eyJhbGciOiJIUzI1NiIsInR5cCI6IkpXVCJ9.eyJpc3MiOiJleGFtcGxlLmNvbSIsInN1YiI6ImFkbWluIiwiZ3JwIjpbImFkbWluIiwidXNlcnMiXSwiYWRtaW4iOnRydWUsImF1ZCI6ImV4YW1wbGUiLCJleHAiOjE1MTQ3NjQ4MDAsImlhdCI6MTQ5OTI2NDQ4NX0.w1Ls_fdotl3SdqFp2GcadSzc8a5Po77qeIUgknZ0X78
Separate them by the character "." and we have three parts. 
The first one is the "Header". It is encoded via Base64, which you can decode via your browser for example.
Try it in your console: atob("eyJhbGciOiJIUzI1NiIsInR5cCI6IkpXVCJ9")
This is going to return {"alg":"HS256","typ":"JWT"} , which stands for
  • typ: the type of the token which is JWT
  • alg: the hash algorithm which is going to produce a signature for the header and the payload
The key part here is that this is not even signed, you can read it anytime! You just need to decode the Base64 string via e.g. your browser or however you would like to.
The middle part is the Payload. Similarly you can decode it by calling
atob("eyJpc3MiOiJleGFtcGxlLmNvbSIsInN1YiI6ImFkbWluIiwiZ3JwIjpbImFkbWluIiwidXNlcnMiXSwiYWRtaW4iOnRydWUsImF1ZCI6ImV4YW1wbGUiLCJleHAiOjE1MTQ3NjQ4MDAsImlhdCI6MTQ5OTI2NDQ4NX0")
which stands for:
{"iss":"example.com","sub":"admin","grp":["admin","users"],"admin":true,"aud":"example","exp":1514764800,"iat":1499264485}
BOOM! Nothing fancy, just decoding some Base64 string, that's it!
These keys are mainly standing for who you are and when this token will be expired, but you can check out more here: https://self-issued.info/docs/draft-ietf-oauth-json-web-token.html#rfc.section.4.1.6
The last part is the signature itself. NOW comes the interesting part.
The plan is the following how we can create a signature:
  • First you need a secret which is a string. In our case it is "That's a secret."
  • Then you'll need to Base64 encode your Header and Payload (remember, these are JSON strings!) - let's call them B64Header and B64Payload from now on.
  • After that you can sign these by passing two arguments for the chosen hashing algorithm (HS256 in this case)
    • The first argument is a string which looks like this: B64Header + "." + B64Payload
    • The second argument is the secret.
  • And the hashing algorithm returns then the signiture, which is going to be the last part of the token. Easy!
To make sure you understood everything visit https://jwt.io/ and try the token I provided in this article and make sure it's signed correctly (so it is a valid signature!)
Cheers!

Monday, June 12, 2017

Writing your own container in Go

This artice is about creating a tool which is like Docker, but much more simplified.

First of all, why do we need containers?

I like to think about containers as separate little planets who live in a universe. There is a planet for database management, other one is for an operating system, etc.. They don't care about each other, however you can create communication between them via e.g. radio waves. This could be  the interface between them.
In my world, what is good about these planets is that you can copy the exact same environment which it had, but who is going to live on these planets is up to that specific instance. (E.g. you can achieve that with quantum entanglements - this is getting a bit too fantasy-like haha.)
Let's get back to our containers. With these you can assure that if it works on your computer, it is going to work on any of them in the world - in theory. Saying that you can easily automate your processes for deployment, make development easier and more productive.
So - long story short - containers are really important for modern development environments.

Ok. How can I create one?

It's not that complex! Really!
First of all, I would like to shout out to Liz Rice, whose talk I saw at Craft Conference in Budapest few months ago. (similar video - twitter)
First, you have to understand two core features: control groups (cgroups) and namespaces.
So what are namespaces?
Well, in it's fundamental, namespace is what a user can see of it's environment: process id-s, file system, users, networking, hostname, etc.. And it's all yours, noone else's!
Ok now, let's see what cgroups are!
If we are sticking to the analogy before, cgroups are what you can use, like CPU, memory, disk I/O, etc.. So basically speaking about resources.
And now let's jump into coding!

As you can see it's not that big of a source code. Only 56 lines!
The basic idea is that we are going to run a system call inside a system call.  At the main function it is going to jump into the run function since first we passed the "run" parameter. (go run main.go run)
Basically what os.exec does is wrapping external commands so they can run in their own namespace. Uhm, excuse me? I have heard about this word before.
Well, no surprise, with this line of code we are going to achieve our own namespace, and we are going to have our own process id-s. Great!
You can see here that we are passing the new argument "child" which means it is going to call the child function.
The next interesting part is the 33rd line where we are passing a bunch of flags for the newly started process, these are:

  • CLONE_NEWUTS is for namespace
  • CLONE_NEWPID is for new process id-s
  • CLONE_NEWNS - this means unshare the mount namespace, so that the calling process has a private copy of its namespace which is not shared with any other process.
Neat! So now we now how we want to run our child process which has it's own namespace and cgroup, but it's still not working in it's own "world". We have to give it a filesystem which behaves like an ubuntu filesystem would work.
So that's where one another trick comes in: we have to have a linux root filesystem which will be the playground of our container. You can learn about the restrictions for the root filesystem here: http://www.tldp.org/LDP/sag/html/root-fs.html .
With this in our toolbelt we can change the root of our child execution to that particular root filesystem directory (46th line), and with the 48th line we are mounting /proc because it's a special kind of directory, and THAT'S IT, if you run go main.go run /bin/bash you will have your own little planet which is completely separate (well, now you know, it's not that separate, but it's acting like it is ;) ).
Enjoy and feel free to play around if you like these kinds of little aspects of modern software development / containerization!

Tuesday, April 11, 2017

Favorite logical puzzles

This topic is a bit related to my JavaScript interview questions post, because I think it is a very good test to see how a candidate relates to a so called 'difficult' problem. If she just freezes, it is a bad sign, but if she starts to cover the options, that's a very good sign.
Here are few of my favorite puzzles:

Tuesday, February 7, 2017

React Redux notes

I've started to work on a project where the frontend is using React with Redux and I thought it would make sense to collect all the confusing parts of this ecosystem which made me think about something twice or more. More or less this article's content is available at the official Redux page. Enjoy!

First of all here are the presentational vs container components in comparison:


Presentational Components
Container Components
Purpose
How things look (markup, styles)
How things work (data fetching, state updates)
Aware of Redux
No
Yes
To read data
Read data from props
Subscribe to Redux state
To change data
Invoke callbacks from props
Dispatch Redux actions
Are written
By hand
Usually generated by React Redux

This is not rocket science, but still, it is a really good separation between components. In one sentence: containers are Redux aware while components are not, they are just getting everything via props (both parts of the state and callback functions which will call some dispatches on the Redux store).

Redux

Here is a silly picture of Redux, but actually it represents well how the state changes are managed.

An action creator is basically a helper for actions where you can pass an argument and it will return an action, nothing fancy.
When are action creators used? Here is a great article: https://daveceddia.com/redux-action-creators/. To sum it up, whenever you need to pass some dynamic values like username or e-mail.
combineReducers:
when there are lots of reducers (a function which handles a call of an action and creates the new state regarding to that action) it is tideous to write a rootReducer like this:
function rootReducer(state = {}, action) {
return {
reducer1: reducer1(state.treeNode1, action),
reducer2: reducer2(state.treeNode2, action),

}};

Very important! Each of these reducers are managing its own part of the global state. The state parameter is different for every reducer, and corresponds to the part of the state it manages.
Actually combineReducers is simplifying this with the following syntax:
import { combineReducers } from ‘redux’;
const app = combineReducers({
reducer1,
reducer2,

});
export default app;
All combineReducers() does is generate a function that calls your reducers with the slices of state selected according to their keys, and combining their results into a single object again.
Store
  • Holds application state;
  • Allows access to state via getState();
  • Allows state to be updated via dispatch(action);
  • Registers listeners via subscribe(listener);
  • Handles unregistering of listeners via the function returned by subscribe(listener).
data flow (how redux handles actions)
  • You call store.dispatch(action).
  • The Redux store calls the reducer function you gave it.
  • The root reducer may combine the output of multiple reducers into a single state tree.
  • The Redux store saves the complete state tree returned by the root reducer.
    - Every listener registered with store.subscribe(listener) will now be invoked; listeners may call store.getState() to get the current state.

React-Redux

  • connect function:
    Basically what you could do is to subscribe to state changes at container components. But this is tideous and react-redux’s connect function does performance improvements where it is calling shouldCompentUpdate in an optimal way.
    • mapStateToProps
      With this function you are able to get a subtree of the Redux store as a prop for a component.
    • mapDispatchToProps
      This function enables you to bind functions which dispatches actions on certain events which were fired by the component.
  • Provider
    It’s a component.
    All container components need access to the Redux store so they can subscribe to it. One option would be to pass it as a prop to every container component. However it gets tedious, as you have to wire store even through presentational components just because they happen to render a container deep in the component tree.
    Provider makes the store available to all container components in the application without passing it explicitly
  • What's the difference between React's state vs props?
    state is a private model while props are sort of public
    “A component may choose to pass its state down as props to its child components.”
    So basically you can’t reach state from the outside, but you can tell parts of the state via props to a component “below” in the component tree)
A very good summary picture (from: https://raw.githubusercontent.com/uanders/react-redux-cheatsheet/master/1440/react-redux-workflow-graphical-cheat-sheet_v110.png)
React Redux cheat sheet

React component lifecycle diagram

A very simple (dumb) implementation of Redux

Sometimes I get really confused how the Redux environment is getting around. These times I get back to this very simplificated implementation of Redux (which is actually a pretty goo starting point).

Async Redux

Well, that's a bit more complicated of a topic. There are a few options if you would like to go with HTTP calls e.g.
E.g. there are great libraries like redux-thunk, redux-promise, redux-saga and many-many more.
Let's talk about redux-thunk first.
The action creator can return a function instead of an action object.
When an action creator returns a function, that function will get executed by the Redux Thunk middleware. This function doesn't need to be pure; it is thus allowed to have side effects, including executing asynchronous API calls. The function can also dispatch actions—like those synchronous actions we defined earlier.
Why do we need redux-thunk? (LINK) We could easily do the following (calling dispatch in the callback) this.props.dispatch({ type: 'SHOW_NOTIFICATION', text: 'You logged in.' }) setTimeout(() => { this.props.dispatch({ type: 'HIDE_NOTIFICATION' }) }, 5000) OR with action creators // actions.js export function showNotification(text) { return { type: 'SHOW_NOTIFICATION', text } } export function hideNotification() { return { type: 'HIDE_NOTIFICATION' } } // component.js import { showNotification, hideNotification } from '../actions' this.props.dispatch(showNotification('You just logged in.')) setTimeout(() => { this.props.dispatch(hideNotification()) }, 5000) OR with the connect() function: this.props.showNotification('You just logged in.') setTimeout(() => { this.props.hideNotification() }, 5000) The problem with this approach is you ca have race conditions, meaning in the above example if two components are waiting for the noticfication request to end, one will dispatch HIDE_NOTIFICATION which is going to hide the second notification erroneously. What we could do is to extract the action creator like the following: // actions.js function showNotification(id, text) { return { type: 'SHOW_NOTIFICATION', id, text } } function hideNotification(id) { return { type: 'HIDE_NOTIFICATION', id } } let nextNotificationId = 0 export function showNotificationWithTimeout(dispatch, text) { // Assigning IDs to notifications lets reducer ignore HIDE_NOTIFICATION // for the notification that is not currently visible. // Alternatively, we could store the interval ID and call // clearInterval(), but we’d still want to do it in a single place. const id = nextNotificationId++ dispatch(showNotification(id, text)) setTimeout(() => { dispatch(hideNotification(id)) }, 5000) } Now separate components will work with the async call: // component.js showNotificationWithTimeout(this.props.dispatch, 'You just logged in.') // otherComponent.js showNotificationWithTimeout(this.props.dispatch, 'You just logged out.') showNotificationWithTimeout need dispatch as an argument, because that function is not part of the component, but it still needs to make changes on the store. (BAD APPROACH: If we had a singleton store exported from some module, then the function does not need the dispatch as an argument. But this si not a good approach since it forces the store to be singleton. (which makes testing harder, becuase mocking is difficult, because it is referencing the same store object)) Now comes the thunk middleware in play. showNotificationWithTimeout is not returning an action, so it’s not an action creator, but it’s sort of because of that purpose. This was the motivation for finding a way to “legitimize” this pattern of providing dispatch to a helper function, and help Redux “see” such asynchronous action creators as a special case of normal action creators rather than totally different functions. With this approach we can declare showNotificationWithTimeout function as regular Redux action creator! // actions.js function showNotification(id, text) { return { type: 'SHOW_NOTIFICATION', id, text } } function hideNotification(id) { return { type: 'HIDE_NOTIFICATION', id } } let nextNotificationId = 0 export function showNotificationWithTimeout(text) { return function (dispatch) { const id = nextNotificationId++ dispatch(showNotification(id, text)) setTimeout(() => { dispatch(hideNotification(id)) }, 5000) } } Important note: showNotificationWithTimeout doesn’t accept dispatch now as an argument, instead returns a function that accepts dispatch as the first argument. Neat! In the component it will look like this: // component.js showNotificationWithTimeout('You just logged in.')(this.props.dispatch) But that looks weird! Instead what we can do is this: // component.js this.props.dispatch(showNotificationWithTimeout('You just logged in.')) Also worth mentioning that the second argument of the thunk (the returned function) is the getState method, which gets us access to the store. Also worth mentioning that not only redux-thunk is there to do async dispatches, but redux-saga (with generators and promises, like async-await) or redux loop.

Summary of async redux flow

Without middleware, Redux store only supports synchronous data flow. This is what you get by default with createStore(). You may enhance createStore() with applyMiddleware(). It is not required, but it lets you express asynchronous actions in a convenient way. Asynchronous middleware like redux-thunk or redux-promise wraps the store's dispatch() method and allows you to dispatch something other than actions, for example, functions or Promises. Any middleware you use can then interpret anything you dispatch, and in turn, can pass actions to the next middleware in the chain. For example, a Promise middleware can intercept Promises and dispatch a pair of begin/end actions asynchronously in response to each Promise. When the last middleware in the chain dispatches an action, it has to be a plain object. This is when the synchronous Redux data flow takes place.